Sunday, April 24, 2011

There's a Method to My Ham-ness

Today my friends and family gathered for an Easter potluck.  My contribution was the main course:  a spiral-sliced ham.  It was a thrifty choice; ham was on sale this week for only $1.49 a pound.  Honey-baked hams go for probably about $7-8 a pound, and making this ham probably takes less time than standing in the very long holiday ham line.

This is the second time that I have tried Cooks' Illustrated's method for cooking a spiral-sliced ham.  This is simply the best recipe I have ever tried for ham because the meat stays moist and tender.  And it's easy, too!

Spiral-Sliced Ham with Maple-Orange Glaze
Source:  Cooks Illustrated magazine

7-10 lb. bone-in spiral-sliced half ham
1 large oven cooking bag

The ham should come factory-wrapped in plastic and may have a netting around it as well.  Do not remove the plastic from the ham but do remove the netting, if applicable.


Get a large food-safe pail (mine was 5 gallons) or even a large cooler and fill it halfway with HOT tap water.  Submerge the plastic-wrapped ham completely.  If your ham is foil-wrapped instead of plastic wrapped, transfer it to a large ziptop bag (2 or 2.5 gallon size) first.
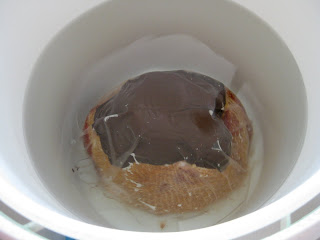
Submerged ham

Let ham sit in the hot water for 45 minutes, then drain and repeat: add HOT water to submerge the ham and allow it sit in the water for an additional 45 minutes.  This allows the ham to slowly warm so that it doesn't have to bake as long in the oven.

Preheat oven to 250 degrees and set the rack to the bottom-most level.  Remove ham from the water and the original plastic covering.  Remove the plastic disk at the wide end of ham.  Place the entire ham cut-side down into a large oven cooking bag and use a  twist-tie to secure, trimming off excess plastic.  Place the bag cut-side down into a shallow roasting pan, pierce the top of the bag with a knife in 3 or 4 places, and place in the preheated oven.

Ham in oven cooking bag
Bake for 10 minutes per pound.  My ham was 8 lbs., so I cooked it for 80 minutes.  Remove ham and increase oven temperature to 350 degrees.  Meanwhile, cut open the oven cooking bag and push it down to expose the top and sides of the ham.

unglazed ham after 80 minutes

Brush the ham with one-third of the glaze and return to the oven for 10 minutes or until the glaze is sticky.

Remove the ham from the oven and brush with another third of the glaze mixture.

Marvelous Maple-Orange Glazed Ham

Let the ham rest for 15 minutes, loosely tented with foil.  While ham rests, mix the remaining glaze with a couple tablespooons of the ham juices and reserve.  Carve ham and serve with the reserved sauce.

Maple Orange Glaze

3/4 cup pure maple syrup (the real deal!)
1/2 cup orange marmalade
2 Tbsp. butter
1 Tbsp. dijon mustard
1 tsp. freshly ground black pepper
1/4 tsp. cinnamon

Combine all ingredients and cook over medium heat until thick and syrupy, about 5-7 minutes.  Use to glaze ham.


Shared at:

Hunk of Meat Mondays


Thursday, April 21, 2011

Passover Brisket

Most Texans love brisket.  I think it may be the State Meat.

Texas, by Dominic Episcopo, from Meat America
I have enjoyed brisket at many BBQ joints,  but I prefer pulled pork.  I think it's because brisket can be very dry and tough unless you get it chopped and smother it in sauce.

This brisket is neither dry nor tough because it's not done on a smoker but is braised in the oven.  It's very economical and feeds a crowd.  Unless you live in Texas, in which case it might just feed your family.   I thought it was fitting that I post this particular brisket recipe on Holy Thursday since Jesus' Last Supper was eaten on Passover.

Passover Brisket
Slightly adapted from a recipe by Emeril Lagasse
(click here to print)


8-10 lb. beef brisket (I used a 6 lb. one but kept the rest the same)
5 lg. garlic cloves, slivered
1 qt. (32 oz.) beef stock
3 large onions, sliced
3 Tbsp. oil
1 Tbsp. Montreal steak seasoning
2 tsp. Emeril's Essence seasoning (recipe found here)
1 tsp. onion powder
1 tsp. garlic powder
1 cup ketchup
1 cup brown sugar
1 cup chili sauce

Preheat oven to 500 degrees. Use a knife to make holes in the raw brisket and stuff each hole with a little piece of garlic. Place brisket fat-side down in a roasting pan and bake until browned, about 20 minutes. Turn and brown the other side, about 15-20 minutes more. Reduce oven temperature to 350 degrees, add beef stock, and cover the pan with heavy-duty foil.  Continue to bake brisket for 1 hour.

From top left to bottom right:  stuff roast with garlic; bake uncovered to brown; add broth, cover and cook 1 hour; add the sauce and bake an additional 2-3 hours; remove to cutting board to rest before cutting.


Meanwhile, heat the oil over medium-high heat and caramelize the onions, stirring frequently, about 20 minutes. Add the seasonings, ketchup, brown sugar, and chili sauce. Mix well and set aside.

Remove brisket from oven after the hour cooking time above and stir in the sauce. Cover and continue to bake for 2-3 additional hours or until very tender but not falling apart. Remove brisket to a board and let rest for 15 minutes.

Slice across the grain into 1/2 inch thick slices.


Strain the sauce. Place the brisket in a pyrex casserole dish and cover with the sauce and refrigerate until the next day.


Reheat at 325 degrees for about 30-40 minutes or until heated through.  You could just eat this immediately, but I think that this brisket tastes better the next day after the flavors have melded.

Braised Beef Brisket

Serve with potato latkes to carry out the Passover theme or do as I did and serve with homemade mashed potatoes.

Linking to:


Photobucket


Sunday, April 17, 2011

Definitely a Tortoise

Remember the childhood fable called The Tortoise and the Hare?  Well, I'm definitely the tortoise.


We started a project a month ago to give the downstairs main bath a face lift.  I'm still plodding along.   Slow and steady may win the race, but I have yet to glimpse the finish line.

In my last installment, I lamented that the sheetrock had damage from removing the wallpaper.


Since then, we have

Patched
Fill with spackle, then sand

Primed


 Textured


Mask the room with plastic and mask yourself!  Respirator required!

I have also painted the trim with alkyd paint which I'll cover in another post.  Baby steps, but the fun stuff is coming soon!  I hope to have a reveal before the end of April. 


Monday, April 11, 2011

Girl Meets Grill

I love pork tenderloin because it is as lean as chicken breast and is a nice change of pace (you know, pork is The Other White Meat!).  This is a recipe that I use when I want to go Greek.


Pork Souvlaki
(click here to print)


1 large lemon, juiced (save the zest for another use if you want)
1/4 cup olive oil
1/4 cup low-sodium soy sauce
1 tsp. dried oregano
3 cloves garlic, minced
2 lbs. pork tenderloin, cut into 1-inch cubes

2 medium yellow onions, cut into 1-inch pieces
1 green or red bell pepper (or some of both), cut into 1-inch pieces

In ziptop bag, combine lemon juice, oil, soy sauce, oregano and garlic.  Swish to combine.  Add pork cubes and let marinate in refrigerator for at least 2-3 hours.  (I let it marinate all day and grill that evening.)  Soak bamboo skewers in water for at least 30 minutes

Remove the pork from the marinade and set aside.  Boil the marinade for about 5 minutes to kill any bacteria because you want to use this to baste the kabobs.  Thread pork, peppers and onions onto bamboo skewers, alternating meat with veggies to make an attractive presentation.  Preheat grill to medium-high heat.  Cook for 10-15 minutes or to desired doneness.  Baste occasionally and turn skewers frequently for even cooking. You do not want to overcook pork tenderloin or it will be dry.


Serve in pita bread with tzatziki sauce.  Heck, throw some feta cheese and tomatoes in there, too, if you want.  You could also eat this in a tortilla, but then we might have a new hybrid cuisine called Continental Con-Fusion!

Tzatziki Sauce

1 cup lowfat plain yogurt, drained (see directions below) OR Greek yogurt
1 large cucumber, peeled and finely chopped
1 or 2 cloves garlic, minced
1/2 T. lemon juice
1 tsp. dried dill (or 1 Tbsp. fresh, if you have it)
1/2 tsp. kosher salt or to taste

Line a sieve with cheesecloth or a couple layers of paper towels, dump in yogurt, place over a bowl, and allow to drain in refrigerator several hours or overnight.  The purpose of this step is to remove as much water as possible from the yogurt.  If you use Greek yogurt, you can skip this step.

Squeeze as much water as possible from the cucumber (I use a clean dish towel).  Combine with the yogurt, garlic, lemon juice, and dill.  Let the flavors marry in the refrigerator while the pork is marinating.  Serve with the pork tenderloin.


So good, and so good for you!  Opa!

Linking this to:

Hunk of Meat Mondays


Friday, April 8, 2011

Cutout Cookie-mania

My friend, Lisa, started a craft group a couple of months ago, and we meet one Friday a month.  I've met a few new friends, including Chantal who is an expert quilter and seamstress.  Today was my day to host and pick the theme.  I sometimes feel like I'm all thumbs when it comes to crafts (especially if needles are involved), so I chose to do something I know a little something about:  Cookies!


We learned how to decorate cutout cookies with royal icing.  Even though I am the daughter of a former cake-decorating genius mom, I had never worked with royal icing before.  So we all learned together!

On a roll

I started by making about 4 dozen cutout cookies in Spring shapes:  snails, bunnies, dragonflies, butterflies, frogs, and flowers.


Here's the recipe I use.  The cookies are nice and soft and have a good flavor.  They also roll out beautifully.

Cream Cheese Cutout Cookies
(click here to print recipes)

2 sticks butter, softened
3 oz. cream cheese, softened
1 cup sugar
1 large egg yolk
1 tsp. vanilla
2 1/2 cups flour

Cream the butter and cream cheese until light and fluffy.  Gradually add the sugar and beat well.  Add the egg yolk and vanilla and mix thoroughly.  Turn the mixer to low speed and gradually add the flour, mixing until just combined.

Flatten the dough into a disk, wrap in plastic wrap, and chill for about 30 minutes or so.  In the meantime, preheat the oven to 350 degrees. Roll the dough on parchment paper or another non-stick surface, to about 1/4 inch thickness.  Cut into desired shapes and place on ungreased cookie sheet.


Bake for 9-10 minutes or until barely brown around the edges.  Let cool on the sheet for 5 minutes before transferring to cooling racks.

Next, I had to figure out how to make royal icing.  I looked on YouTube (isn't the internet great?!) and found that royal icing is used two ways on cutout cookies:  It's piped around the edge of the cookies to form a barrier (dam), and the inside of the cookie is then flooded with thinned icing.


Here is the recipe I used since I didn't want to use raw egg whites:

Royal Icing

4 cups sifted powdered sugar (about 1 lb.)
3 Tbsp. meringue powder (available near the cake decorating supplies)
6-8 Tbsp. warm water
1/4 tsp. lemon extract (or extract of your choice)

Combine all ingredients and beat with electric mixer on LOW for 8-10 minutes.  The icing should initially have the consistency of a thick Elmer's glue. (Ribbons will stay on the surface of the icing when the beaters are lifted.)

Divide the icing into bowls and tint with food coloring.  Put each color into a separate piping bag (we used quart-sized ziptop bags fitted with a #3 or #4 plain tip.  Clip off the edge of bag if using that.  Pipe around the outside of cookies to form a barrier.

Let dry for about 10 minutes.  Then thin the remaining colored  frosting with a little water so that it is about the consistency of heavy cream.  Pour into squeeze bottles and flood the interior of the cookie (i.e., fill it in).  Use a toothpick to spread the frosting around and to pop any bubbles you see.  Decorate with sprinkles, sanding sugar, or however you desire!

Here's how it all looked when we finished:


Oh wait.  That's probably not what you wanted to see!


I wish that I could claim that these beauties were mine, but let's just say we definitely had an overachiever or two in the group!  We all felt like we gained insight into decorating holiday cookies in a new way, and we had a blast making these and just hanging out.

I think next month we may be doing something with...needles.  Uh oh.


Linking to:


Wednesday, April 6, 2011

Colossal, Versatile Cupcake Carrier

Do you hate to transport cupcakes and cake as much as I do?  It seems like the frosting always gets messed up.  You feel like you need to cover whatever you're bringing, but plastic wrap and toothpicks isn't a very efficient or attractive way to keep the frosting intact.

Look what I bought for ten bucks at Costco the other day!  Problem solved!


This has enough room for 3 layers of 12 cupcakes each--a whopping 36 cupcakes total!


I wish I had owned this when my kids still had birthday parties at school and belonged to Scouts, etc. where we often brought snacks.  Regardless, this is still a useful container because in addition to transporting cupcakes and muffins, it can be used as a cake carrier (2-layer or up to 9x13" rectangle) and even a cookie carrier.


There are three plastic sheets that go over the cupcake wells to create a more "solid" layer.


I think this is going to get a lot of use when I bring food elsewhere, which is quite often!  This could, of course, also be used to carry things other than sweets: side dishes or appetizers, for example.  This unit is very well designed, so there shouldn't be any unpleasant spills.

lid clamps down
handle is molded in

 Do you have any tips for transporting food neatly and/or creatively?


Monday, April 4, 2011

Do the 'Cue

The Spring weather in Texas has been pleasantly warm for the most part, but I know that some parts of the country haven't quite thawed out yet.  Here's a wonderful recipe for a slow-roasted pulled pork that just may fool you into thinking it came straight off the barbecue.

Crowd Pleasin' Oven-Roasted Pulled Pork
Source:  Emeril's Potluck by Emeril Lagasse

1 pork shoulder roast aka Boston butt (6-8 lbs.) 
4 tsp. Emeril's Essence seasoning (sold in spice section or make your own using recipe below)
1 tsp. cayenne pepper
1 Tbsp. salt

Combine the Essence, cayenne, and salt and rub generously over all sides of the pork.  Put roast in a ziptop bag and refrigerate for several hours or overnight.

Preheat oven to 325 degrees.  Place a rack in a large roasting pan and place the roast on the rack, fat side up.
Dry rub on raw pork butt

Cover the roaster with heavy-duty aluminum foil and bake for 4 hours.

Pork after 4 hours

Remove the foil (carefully! so that you don't get a nasty steam burn) and continue to cook for an additional 2 hours.

Pork after 6 hours
 Remove from the oven and separate the fat (if desired--it tastes great, kinda like bacon, but obviously isn't very healthy).  Shred the meat using two forks.


Naked Pulled Pork (no sauce)
Warm about 2 cups of your favorite barbecue sauce and mix with the pork so that it doesn't dry out.  My favorite BBQ sauce for this recipe is equal parts Jack Daniels Honey Smokehouse and Spicy Original.  The hickory sauce gives the illusion that the meat just came from the smoker, and the spicy original gives it a nice little kick.  Pile the pork into buns and serve with additional sauce on the side.  If you're serving a crowd, keep it warm in your slow cooker.

Pulled Pork Barbecue with Crispy Coleslaw
 Essence Seasoning Mix:

2 1/2 Tbsp. paprika
2 Tbsp. salt
2 Tbsp. garlic powder
1 Tbsp. black pepper
2 Tbsp. onion powder
1 Tbsp. cayenne pepper
1 Tbsp. dried oregano
1 Tbsp. dried thyme

Combine all ingredients thoroughly.

This is so easy that there's no reason NOT to do the 'cue!

Linking to:


Mouthwatering Mondays


Hunk of Meat Mondays